Read records from an existing external database without copying all of its data into Twidget.
Select your workspace and open Settings → Database Connections.
Select Add database connection.
Choose the provider: PostgreSQL, MySQL, SQL Server or Snowflake.
Enter a connection name, host, port, database name and username.
For PostgreSQL, MySQL or SQL Server, enter the password. Keep Use a secure connection enabled.
For Snowflake, enter the account and any required warehouse, schema and role, then supply the key as described below.
Save the connection.
Ask the person who manages your database for these details and for an account that can only read the records you need. A saved connection does not by itself prove that the destination is reachable; test a small read query.
Saved passwords are not shown back in the connection list. When editing, leave the password blank to keep the saved password.
This example shows a saved connection being edited. Use the connection details supplied by your database administrator.
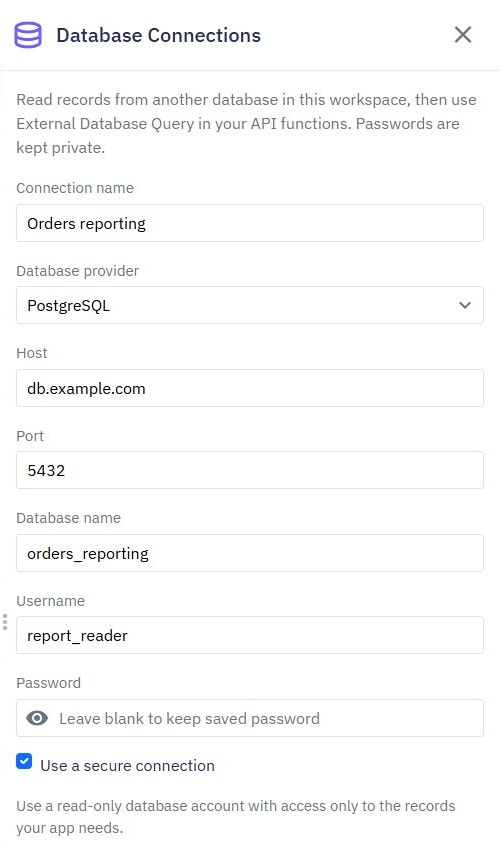
Connections belong to their workspace. After copying a workflow to another workspace, create or select a connection there before running its external queries; saved credentials are not copied with the workflow.
New Snowflake connections select Key pair (recommended) under Authentication. This lets the connection run without an interactive sign-in.
Ask your database administrator to prepare a read-only service user and a key pair. The key must be RSA with at least 2048 bits; its private key must be in PKCS#8 PEM format. The administrator registers the public key with the service user. Keep the private key and any passphrase private.
Choose Snowflake and enter the host, account, username, database and other connection details supplied by your administrator.
Keep Key pair (recommended) selected.
Paste the private key into Private key (PEM).
If the key is encrypted, enter Private key passphrase (if encrypted).
Save the connection, then test a small read query.
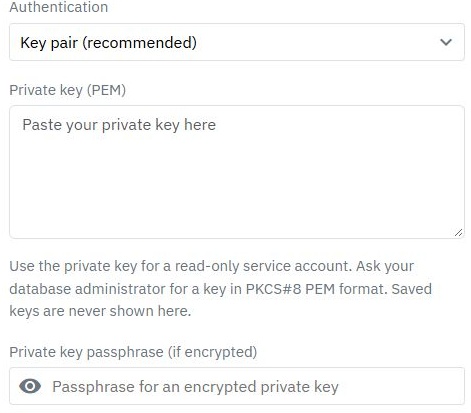
Saved keys and passphrases are never displayed. Leave both blank when editing to keep the saved key and passphrase. When replacing a key, enter the new key's passphrase if needed; a replacement key clears the previous passphrase. Switching the provider or authentication method clears the credentials you have entered, so supply the credentials for the newly selected option.
Existing password connections keep Password (existing connections). Ask your administrator to migrate an unattended Snowflake connection to a read-only service user with key-pair authentication. Keep your account's sign-in protections in place; do not disable MFA or weaken security rules to make a password connection work.
The Snowflake controls have been checked in the app, but a live Snowflake connection has not yet been verified. Save does not prove that the account or key can connect.
Add External Database Query.
Choose the saved Database connection.
Supply a single supported read query in Query, or select a variable containing it.
Put changing values in the Parameters list.
Choose Timeout (milliseconds) and Maximum records.
Set Return as, save and test.
This feature reads records. It does not support scripts, schema changes or commands that change external records.
Keep values such as a customer's ID separate from the query text. For example, ask your database administrator for a query template that finds a customer by email, then place the actual email in Parameters.
Parameter positions depend on the provider. PostgreSQL uses $1, $2; MySQL and Snowflake use ?; SQL Server uses @p1, @p2. Match the parameter list to the order in your query.
Do not build a query by inserting form answers directly into its text. Use parameters for those answers.
For PostgreSQL, this query returns orders whose amount is at least the first parameter:
SELECT id, customer, amount

FROM orders

WHERE amount >= $1

ORDER BY id
Set Parameters to [20], choose a suitable timeout and limit, then save and test. This example uses a timeout of 5,000 milliseconds and a maximum of 10 records.
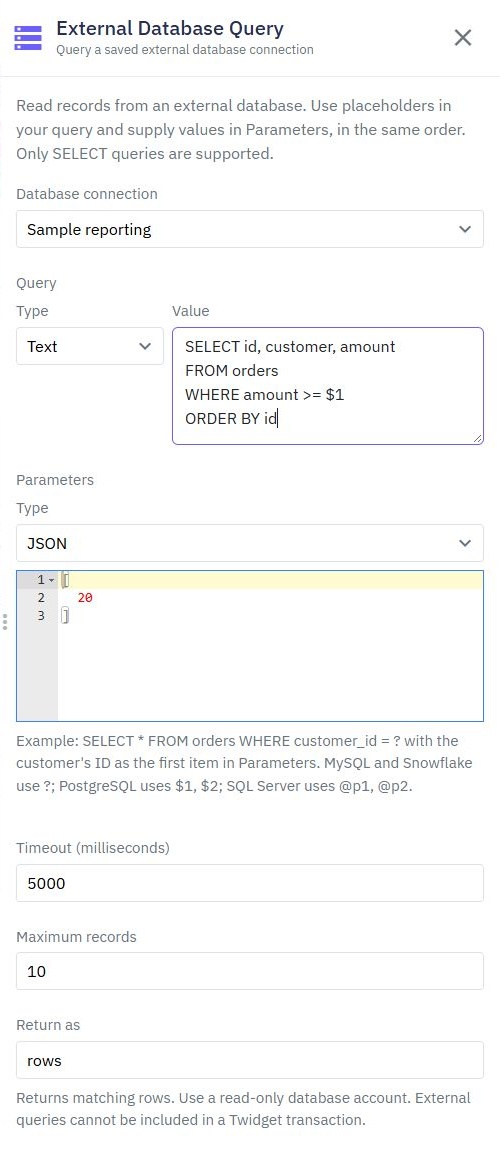
In this sample database, the result contains Blake's order for 20 and Casey's order for 30.
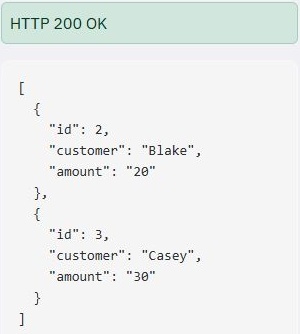
Some databases return decimal amounts as text. Check the returned values before using them in number calculations.
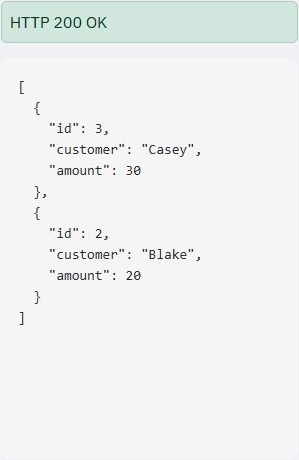
For SQL Server, use @p1 in place of $1. Adding DESC to the end of the ORDER BY id line returns orders with higher IDs first. With the same sample values and parameter [20], Casey's order for 30 appears before Blake's order for 20:
The database must be reachable from Twidget through an allowed destination. Local-only or private network addresses are restricted in the standard runtime. Your database administrator may need to allow Twidget's connection and arrange the correct secure access.
For example, entering localhost shows this message. Ask your database administrator for a publicly reachable host instead.

Choose a small result limit and filter the query. Oversized results, unavailable destinations or a query that exceeds its timeout produce an error. Handle that error in your workflow and give the user a helpful message.
External queries cannot be included in a Database Transaction for Twidget's own tables.
Oracle connections are not available in this version.
CSV Import
Twidget enables seamless import of data from a CSV file into your database. Follow the steps below to successfully import a CSV file. Step-by-Step Guide. 1. Initiate the Import: - Click on the Import button within the table toolbar. - Select Import from CSV from the dropdown. 2. Open Import Dialog: ...
Adding Database Table Rows
In Twidget, you can easily add new entries (rows) to your database tables. This feature allows you to expand your data dynamically without the need for complex coding. This document provides a step-by-step guide on how to add rows to your database tables. Adding a New Entry to a Table. To add a new ...
Table Relationships
In Twidget, you can connect database table data using the `_id` field that is automatically generated for every row in a table. This `_id` field is essential for creating and maintaining relationships across different tables. Types of Relationships. A one-to-one relationship occurs when a single row...
Summarise Records
Use Summarize Records when you need a summary rather than a list of every record. Create a summary. 1. Add Summarize Records to your workflow. 2. Choose the table and add filters if you only want some records. 3. Open Output and add a calculation. 4. Choose Count, Sum, Average, Lowest or Highest. 5....
Authentication Table
An authentication table is a crucial component in Twidget that is used to store all necessary authentication information, essential for authenticating requests. Overview. - Purpose: To store authentication details such as email, password, token signature, and reset key. - Recommendation: It's recomm...