

Customer Signup, Login and Logout
Build customer signup, login and logout for your application. Follow the authentication endpoints and test the customer session flow.
Watch tutorial (4:41)
Build customer signup, login and logout for your application. Follow the authentication endpoints and test the customer session flow.
Watch tutorial (4:41)Follow these steps to create authentication endpoints in Twidget:
Navigate to API Tab:
API tab in your Twidget dashboard.Create New Endpoints:
Create Endpoints button located at the top right corner.
Select Authentication:
Authentication. This will enable various authentication endpoints.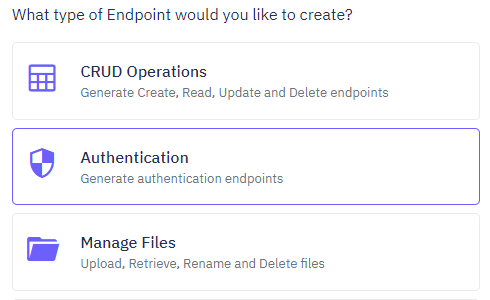
Before creating authentication endpoints, ensure you have an authentication table set up. This table will store all user and authentication data.
Select Authentication Table: Choose the authentication table where user and auth data will be stored.
Set Starting Path: Define the base path you want to prepend to all the endpoints.
Once the authentication option is selected, you will see the following 7 endpoints ready to be generated:
/auth/signup: Endpoint for user signup.
/auth/login: Endpoint for user login.
/auth/me: Retrieve user details.
/auth/logout: Invalidate the current authentication token.
/auth/update-password: Update the user's password.
/auth/forgot-password: Send password reset key via email.
/auth/reset-password: Update the password using the reset key.
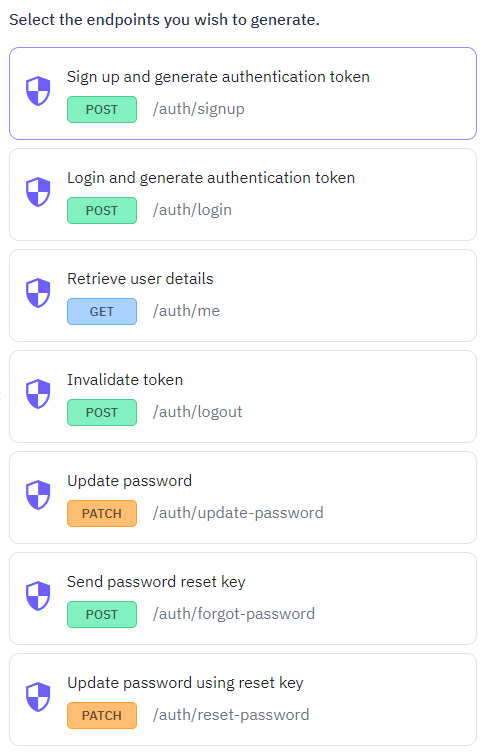
Each authentication endpoint comes pre-configured with necessary inputs, outputs, and command steps required to accomplish its task. However, you can edit these configurations as per your requirements.
When building or updating your own account workflows, use Customer Login, Request Customer Password Reset, Reset Customer Password and Change Customer Password with your authentication table.
The reset-request command gives a generic success response so the page does not reveal whether an email is registered. Ask the customer to check their email. The reset command takes the email, reset key and new password; reset keys expire and can only be used once.
Use Change Customer Password for an authenticated customer, supplying their current password and the new password. Take the customer ID from the signed-in customer rather than letting the form choose whose password changes. After a successful password reset or change, existing sessions are revoked and the customer must sign in again.
Test successful recovery, a wrong or expired key, a reused key and an incorrect current password using sample accounts. Keep password and reset-key values out of your page responses and shared examples.
Newly generated signup and logout workflows use Customer Signup and Customer Logout. Their existing paths and response formats remain available. Existing saved workflows are preserved.
Use Create Customer Session when you want independent logins on multiple devices. The Authentication page lets you suspend or resume a customer and revoke sessions. Follow Customer authentication tools for setup, limits and testing guidance.
Action Stats
Action Stats gives Twidget administrators a history of endpoint calls and event runs. It is an admin tool, rather than a workspace feature available to every team member. Find a run. Open Action Stats in the admin sidebar. Filter by workspace, organization, action type, test or real call, result, st...
Response Settings
You can customise the successful response from an endpoint, including its status code and additional headers. Configure a response. 1. Open the endpoint and its Output editor. 2. Select RESPONSE. 3. Choose a status code or select a variable from the commands section. 4. Add a response-headers object...
Create File Endpoints
Overview. Twidget allows you to create file endpoints, which enable you to manage files in your file store. This feature is designed to streamline your workflow by providing predefined endpoints for common file operations. Creating File Endpoints. To create a file endpoint in Twidget, follow these s...
API Settings
The API settings in Twidget enable you to customize your APIs to fit your requirements. Here’s how you can do it: Configure. 1. Navigate to the API page. 2. Click on the Settings button located at the top-right corner. This will open a sidebar where you can configure various settings for your API. A...
API Limits
API limits help you control how often people can call the endpoints in a workspace. You can set a short-term limit and a monthly allowance. Set workspace limits. 1. Select the workspace you want to manage. 2. Open Settings, then API Limits. 3. Enable API limits. 4. Under Allowance per, choose user o...