Let a server function continue in the background while the original workflow returns a job ID. This is useful for work such as preparing a report or processing a batch of records.
A function or endpoint is not automatically a background job. A job is created only when a workflow calls a published server function with Run in background selected. Opening that function and running its own test runs it normally; it does not queue a job.
To test background execution, run the endpoint, function or event that contains the Run in background call. The caller returns a job_id you can find in Background jobs.
Publish the server function you want to run.
Add that function to an endpoint, server function or event workflow.
Click the Custom Function command row under Commands to open its editor. Click the command row itself; the linked function name opens the function definition instead.
At the top of that sidebar, change Execution from Wait for result to Run in background.
Supply its inputs using the usual variable controls.
Set the maximum run time and, optionally, a delay and an idempotency key.
Choose Return as to name the job details returned to the calling workflow.
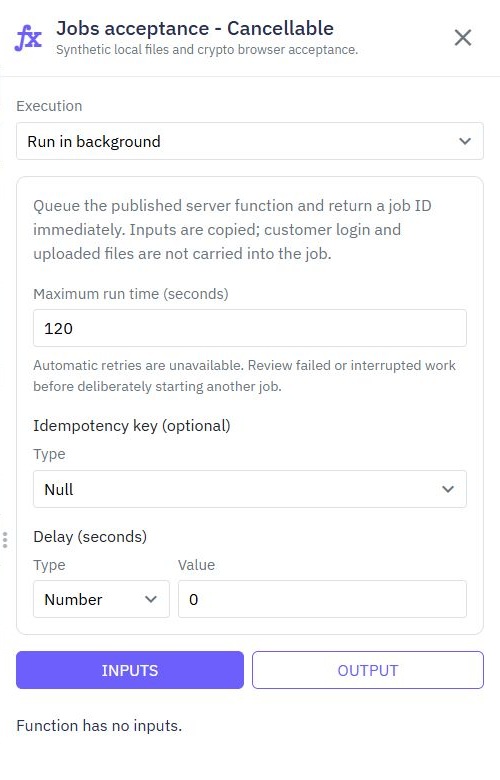
The caller receives job_id, state, created_at and queue_deadline_at. It does not wait for the background function's result. Leave Execution as Wait for result when later commands need that result immediately.
The function receives a copy of its inputs. The original customer's login and uploaded files do not follow it into the background. Design it to work with explicitly supplied, permitted record IDs and values. Background execution is available to server workflows, not page workflows.
An optional Idempotency key identifies one logical request. Reusing the same key for that request returns the existing job instead of creating another one. Use a different key for a deliberately new action. Do not put passwords or customer tokens in keys.
Automatic retries are not available in this release. Review failed, timed-out or interrupted work before deliberately starting a new job. A job may have completed some actions before it stopped.
Open Background jobs in the sidebar. Choose Live jobs or Test jobs, then filter by state, function ID or created date. Click a date heading to change the order. Select a function or job to open its details.
Editor tests create Test jobs, even when Use live data is enabled. The page initially shows Live jobs, so choose Test jobs to see calls queued by editor tests. Changing the environment loads its jobs immediately. Returning to the page refreshes its history; use Refresh to check again while staying on the page.
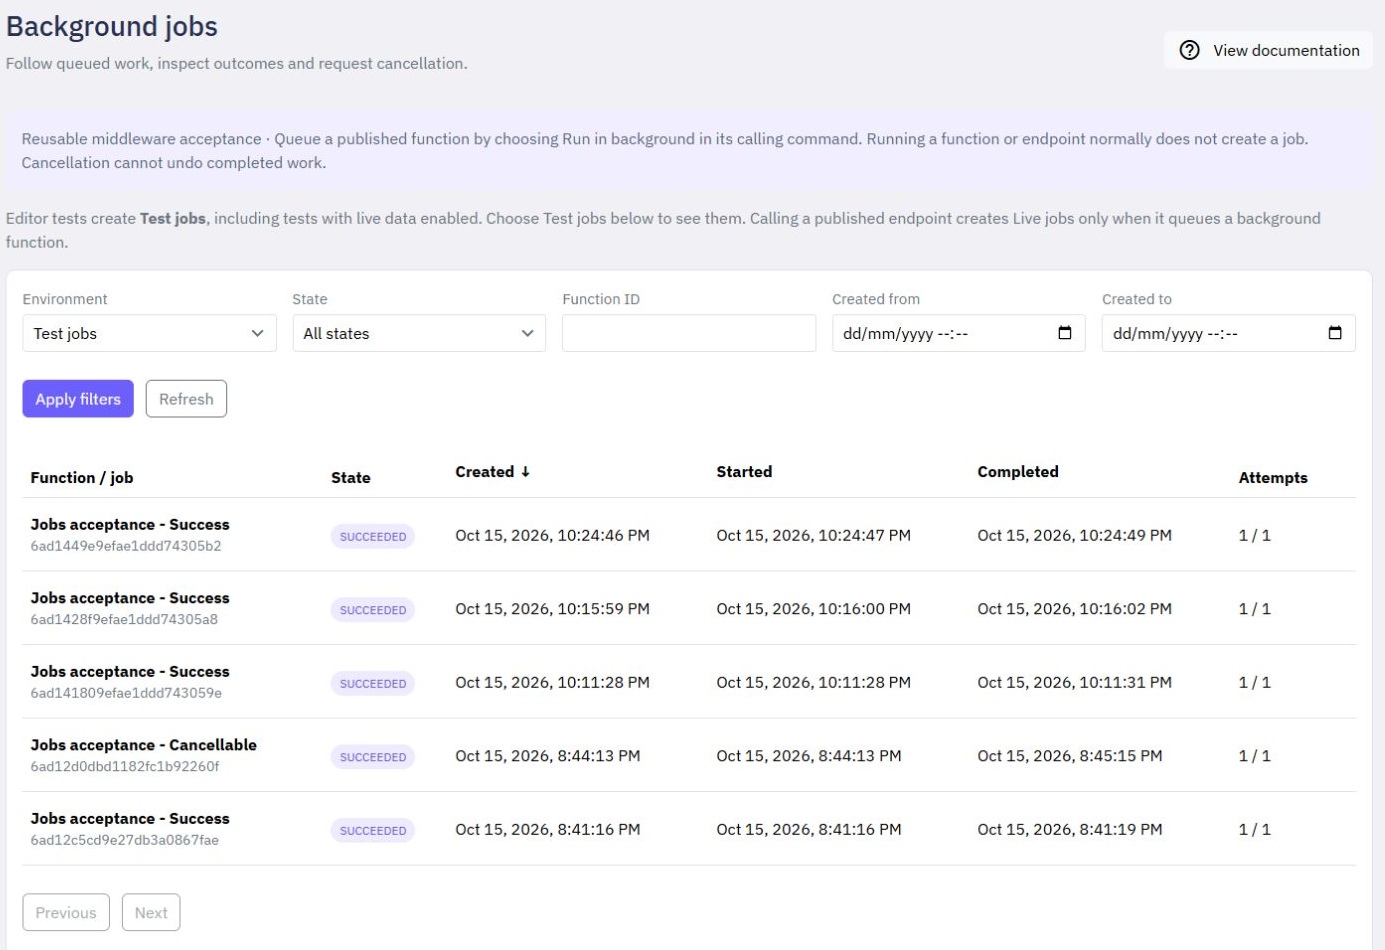
A job can be queued, running, succeeded, failed, timed out, cancellation requested, cancelled or interrupted. Interrupted means execution stopped unexpectedly and its effects may be uncertain. Check what happened before running it again.
Details distinguish its scheduled time, queue deadline and retention end. The queue deadline is the latest time it can begin; retention end is when its finished history is cleared. Results load only when you select Load result.
You can also follow and cancel a job from another server workflow. In Add command, open Background jobs:
Get Background Job: supply the job_id returned by the background call. Turn on include_result when you need the finished function's result. Save the output with Return as, then use its state to decide what happens next. A result is available only after it has been stored.
Cancel Background Job: supply the same job_id to request cancellation. Read the returned state; a running job may first show CANCEL_REQUESTED before it stops.
These commands look up jobs in the current workspace and environment. Editor tests look up test jobs; live workflows look up live jobs. They do not pause until a job finishes. For example, a status endpoint can receive a job ID, use Get Background Job, and return its current state to your app.
Choose Cancel on a queued or running job and confirm. Cancellation is a request to stop further work; it cannot reverse completed emails, external calls, file changes or record changes. Refresh to see the resulting state.
Test jobs use test data. A background job has its own test data context; it does not continue an endpoint test's private record changes. Use self-contained inputs and starting data for background tests.
Operational limits on queued and concurrent work keep workloads responsive. Each job has a maximum run time of up to five minutes. Finished job history is retained for 30 days. Keep lasting business results in your own tables rather than relying on job history.
Changes
In Twidget, every modification you make in our no-code builder is meticulously documented and stored as a change. Whether you are creating an input or editing a command, each action is captured in the platform. Important: Please note changes will not go live until they are published. Viewing Changes...
Globals & secrets
Keep shared configuration and private values in one place. Open Global at the top of an endpoint, function or event, or open the manager from Settings. The Variables and Secrets tabs belong to the selected workspace. Use ordinary variables for reusable settings such as a default page size or service...
Variables
Variables are essential building blocks in Twidget that allow you to store and manipulate data dynamically within your no-code applications. They enable you to create flexible and interactive applications by holding values that can be changed and referenced throughout your workflow. Creating Variabl...
Publishing Changes
With Twidget's publishing feature, you can seamlessly push your changes live, ensuring that your updates take effect on the specified endpoint, function, or event. This feature also allows for version control, enabling you to revert and manage different versions of your changes effectively. Steps to...
Reusable Middleware
Middleware is a reusable workflow that runs before or after an endpoint, function or event. Build it once, then apply it wherever you need the same input checks, response formatting or logging. Create middleware. Open Middleware from the sidebar and choose Create Middleware. Give it a clear name, su...