Use your workspace's Authentication page to manage customer access and independent login sessions. Build signup, login and logout workflows with the authentication commands in the command picker.
These tools use your existing authentication table. They manage people signing in to your application. Your own Twidget account and team membership are managed separately.
Open Database and create or update your customer table with Authentication Table enabled. Each workspace has one authentication table. Its email and password fields support your existing customer accounts; additional profile fields can remain in the same table.
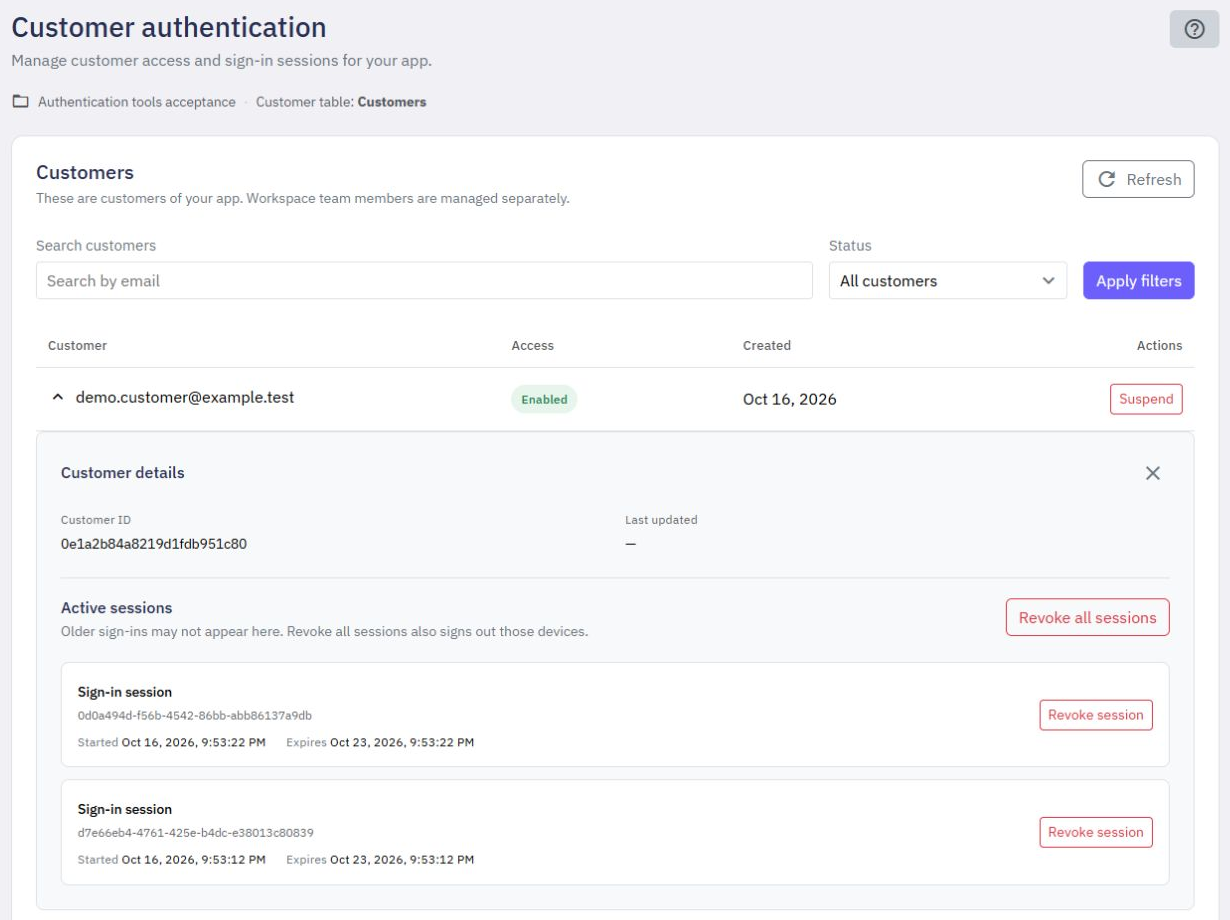
Open Data → Authentication to see the table's customers. If no authentication table is configured, follow the page's setup guidance first. Opening this page does not create another workspace or customer table.
Search by email, filter by account status and use the page controls to load more customers. Select a customer row to expand its details and sessions directly beneath that row.
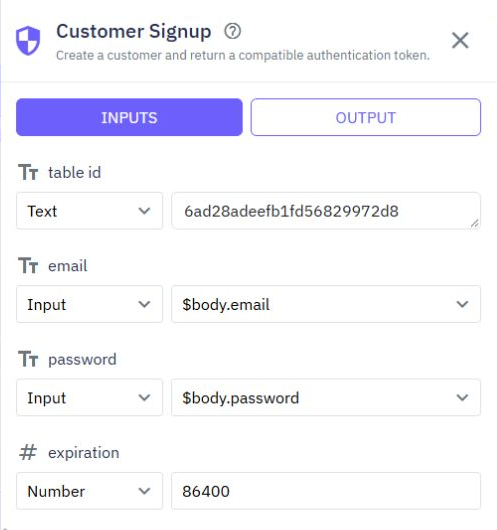
Use Customer Signup with your authentication table, the submitted email and password, and an optional token expiration in seconds. For example, 86400 means one day. Take customer credentials from request inputs rather than saving real passwords in a command.
The command creates an account and returns the familiar token, expiration and signature result. A duplicate email does not replace an existing account. Email matching retains the existing exact-case behavior, so send the same email value when signing in.
Passwords must contain at least six characters and fit within the supported 72-byte limit. Some characters use more than one byte. If the existing table already has duplicate emails, review those accounts before using the new signup command; the command does not delete or merge them.
Newly generated authentication endpoints use this command for signup. Existing saved workflows remain available and are not rewritten automatically.
Customer Login keeps its existing behavior and result fields. Existing login workflows and previously issued valid tokens continue to work, subject to expiry, password changes, logout and account suspension.
Use Create Customer Session when a customer should have independent logins on multiple devices. Supply the authentication table, email, password and an optional expiration in seconds. The result has the same token, expiration and signature fields, so it can be returned by your login endpoint and used as a bearer token.
Independent sessions are tied to the customer and workspace. Their default lifetime is seven days and their maximum lifetime is 30 days. Choose a shorter lifetime for sensitive applications.
Keep session creation, listing and revocation outside database transaction blocks. An unsupported placement returns an error rather than creating a partially managed session.
To enable this style in an existing login workflow, deliberately replace its login command with Create Customer Session, preserve the request inputs and output mapping, and test the endpoint before publishing. Existing workflows are not switched to independent sessions automatically.
Use these commands inside a customer-authenticated endpoint:
Customer Logout ends the current customer's login. With an independent session, other devices remain signed in.
List Customer Sessions lists the signed-in customer's active independent sessions, with creation and expiration dates.
Revoke Customer Session ends one independent session belonging to the signed-in customer. Supply its session ID from the session list.
Logout All Customer Sessions invalidates the current customer's existing logins, including the older login style.
These commands take the customer identity from the authenticated request. They do not let a form choose another customer's identity. Use Bearer Token authentication on the endpoint, then test with a real sample customer's token.
The Authentication page also lets an authorized workspace member view a customer's independent sessions and revoke one or all logins after confirmation. A customer using the older login style may have no independent session rows; Revoke all sessions also invalidates that customer's older login.
Password reset and password-change commands continue to invalidate existing logins. Sessions that expired or were invalidated cannot be revived by resuming an account.
On Authentication, expand the customer and choose Suspend. Confirm the customer shown in the dialog. Suspension prevents login and protected API access, and invalidates existing logins.
Choose Resume to allow the customer to sign in again. The customer needs a new login; resuming does not restore old sessions. Existing customer-defined profile fields, including a field named enabled, keep their original meaning.
The supported login and signup commands have bounded attempt protection. Protection windows last 15 minutes. Repeated failed attempts can temporarily prevent another attempt. The default permits ten counted attempts; concurrent checks may also temporarily use that allowance. Waiting for the next window may be necessary even when the next password is correct.
This protection uses shared bounded capacity. It is separate from your API rate limits. Older workflows assembled from general password-matching and database commands do not automatically gain the new command-level protection.
A customer can hold up to 20 independent session entries, and a workspace can hold up to 10,000. Entries that expired, were revoked or were invalidated by a password change can be reused. When capacity is busy or full, wait, revoke an unneeded session or choose an existing login as appropriate. Session expiry is checked when access is requested; delayed history cleanup does not extend access.
Use a sample account to check signup, duplicate signup, a wrong password, a valid login, session revocation, suspension and resuming with a fresh login. With independent sessions, create two logins and confirm that ending one leaves the other working. Test password recovery again after changing a login workflow.
Keep passwords, tokens and reset keys out of page messages, logs and shared examples. Review your endpoint's response before publishing. See Authentication, Authentication test tokens and Testing for the existing tools.
What is an API
An API (Application Programming Interface) is a set of rules and protocols that allows different software applications to communicate and interact with each other. It defines the methods and data formats that applications can use to request and exchange information, services, or functionalities from...
Streaming responses
Send updates progressively while an endpoint is running, instead of waiting for one final response. This is useful for progress messages or generated text that your app can display as it arrives. Enable a streaming endpoint. 1. Open the endpoint and choose Update endpoint. 2. Set Response mode to St...
Generate CRUD Endpoints
What are CRUD Endpoints?. CRUD stands for Create, Read, Update, Delete. These are the basic operations required to manage data in a database. Each operation corresponds to a specific HTTP method: - Create: Adds new data (HTTP POST) - Read: Retrieves data (HTTP GET) - Update: Modifies existing data (...
API Limits
API limits help you control how often people can call the endpoints in a workspace. You can set a short-term limit and a monthly allowance. Set workspace limits. 1. Select the workspace you want to manage. 2. Open Settings, then API Limits. 3. Enable API limits. 4. Under Allowance per, choose user o...
Action Stats
Action Stats gives Twidget administrators a history of endpoint calls and event runs. It is an admin tool, rather than a workspace feature available to every team member. Find a run. Open Action Stats in the admin sidebar. Filter by workspace, organization, action type, test or real call, result, st...